Create Context
Initialize node
Terminal
merod --node-name node1 init --server-port 2428 --swarm-port 2528
Node configuration file contains protocol defined metada and is located at
~/.calimero/your_node_name/config.toml.
Run node
Terminal
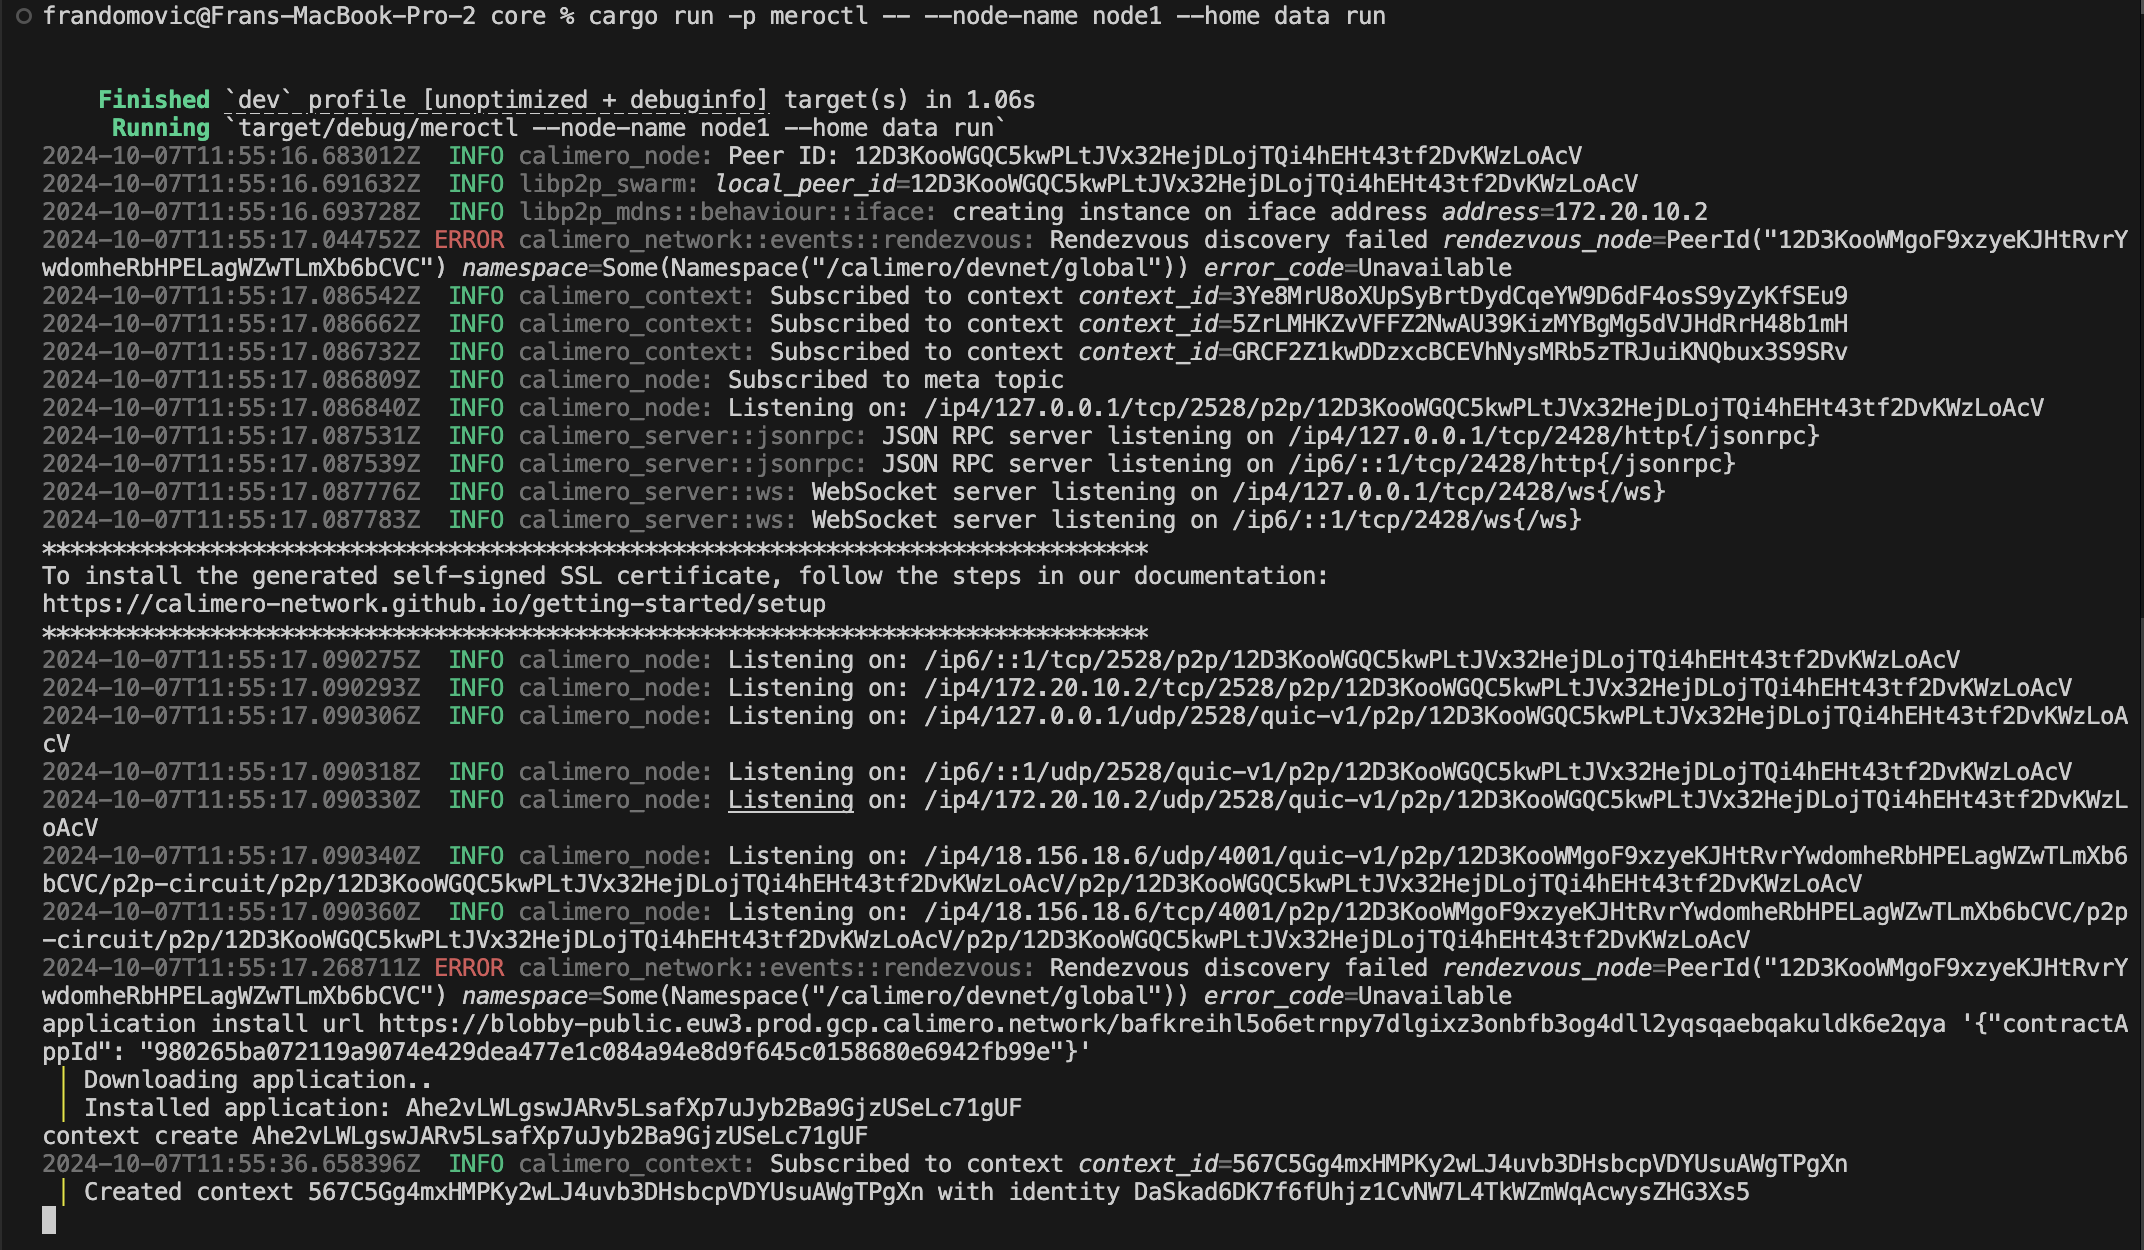
merod --node-name node1 run
Wait for a few moments and node logs should appear.
Create a New Context
- Meroctl
- Interactive cli
- Admin Dashboard
- Near
- Starknet
- ICP
- Stellar
- Ethereum
Terminal
meroctl --node node1 context create --application-id 3Hfk2VekXQ58vYHW3hUtA3mh2Rwtb1brV1RKEXtfvfsf --protocol near
Terminal
meroctl --node node1 context create --application-id 3Hfk2VekXQ58vYHW3hUtA3mh2Rwtb1brV1brV1RKEXtfvfsf --protocol starknet
Terminal
meroctl --node node1 context create --application-id 3Hfk2VekXQ58vYHW3hUtA3mh2Rwtb1brV1RKEXtfvfsf --protocol icp
Terminal
meroctl --node node1 context create --application-id 3Hfk2VekXQ58vYHW3hUtA3mh2Rwtb1brV1RKEXtfvfsf --protocol stellar
Terminal
meroctl --node node1 context create --application-id 3Hfk2VekXQ58vYHW3hUtA3mh2Rwtb1brV1RKEXtfvfsf --protocol ethereum
tip
--application-idflag specifies the application ID to attach to the context--protocolflag specifies the protocol to use for the context--asflag creates an alias for your identity in your context, you can use it instead of the PublicKey
Install the Application
Run the following command to install the application:
Node Terminal
application install url {url} {metadata}
note
metadata example:
'{"contractAppId": "3Hfk2VekXQ58vYHW3hUtA3mh2Rwtb1brV1RKEXtfvfsf"}'
Create a New Context
- Near
- Starknet
- ICP
- Stellar
- Ethereum
Node Terminal
context create --application-id 3Hfk2VekXQ58vYHW3hUtA3mh2Rwtb1brV1RKEXtfvfsf --protocol near
Node Terminal
context create --application-id 3Hfk2VekXQ58vYHW3hUtA3mh2Rwtb1brV1RKEXtfvfsf --protocol starknet
Node Terminal
context create --application-id 3Hfk2VekXQ58vYHW3hUtA3mh2Rwtb1brV1RKEXtfvfsf --protocol icp
Node Terminal
context create --application-id 3Hfk2VekXQ58vYHW3hUtA3mh2Rwtb1brV1RKEXtfvfsf --protocol stellar
Node Terminal
context create --application-id 3Hfk2VekXQ58vYHW3hUtA3mh2Rwtb1brV1RKEXtfvfsf --protocol ethereum
tip
--application-id flag specifies the application ID to attach to the context.
--protocol flag specifies the protocol to use for the context.
Output
2024-10-07T11:55:36.658396Z  INFO calimero_context: Subscribed to context context_id=567C5Gg4mxHMPKy2wLJ4uvb3DHsbcpVDYUsuAWgTPgXn
Created context 567C5Gg4mxHMPKy2wLJ4uvb3DHsbcpVDYUsuAWgTPgXn with
identity DaSkad6DK7f6fUhjz1CvNW7L4TkWZmWqAcwysZHG3Xs5
Create a context using the Admin Dashboard
- Navigate to the "Contexts" tab and click the "Start New Context" button.
- Use the "Browse" button to select an application from the list.
- Choose application.
- Press "Start" to initiate the context creation process with the selected application.
Visit Admin Dashboard Page to view detailed instructions with images.
After the context is created, you will be redirected to the context dashboard. Keep this page open as you will need the Context ID later.
You have now created a new context.
To create an alias for this context, use:
Terminal
meroctl --node node1 context alias add my_context 3Hfk2VekXQ58vYHW3hUtA3mh2Rwtb1brV1RKEXtfvfsf
Next step is to invite users to join your context. Continue with invitations and joinings.
Was this page helpful?